Mixing & export
Effects: clips and tracks
A practical guide to the FX tab in Studio: process one phrase or an entire track, choose among 18 built-in effects, understand every parameter and connect compatible WAM plugins.
Quick start: add delay to a voice
- Record a voice or add audio to the timeline. Click the clip you want to process.
- Open FX · Effects on the right. If the panel is hidden, enable the Studio sidebar in the top toolbar. On a narrow screen, select a clip or open its track mixer first.
- Choose Selected clip. Check the track name and clip position displayed above the chain.
- In the menu below Effect chain, choose Delay, then press Add effect. Selecting a menu option alone does not add a processor.
- Try Time 300 ms, Feedback 0.25 and Dry / wet 15–25%. These are starting values, not a required preset.
- Start playback and compare with Enabled turned off. In standard playback mode, stop and start again after changing settings.
- To apply delay to every phrase on the track, choose Entire track and add it there. This is a separate chain: the clip effect does not move into it automatically.
Processing does not overwrite the source audio file. Effect settings are saved with the project and support Undo / Redo.
Choose what to process
| Target | What it processes | When to use it |
|---|---|---|
| Selected clip | One active audio clip; its result then passes through track processing | Echo on a final word, a special passage, correction of one recording |
| Entire track | All clips on the chosen audio or MIDI track after they are combined | Shared processing for a vocal, bass, drum or instrument part |
| Master bus | The combined mix in the existing master panel | Final balance and overall processing; this is not a target in the clip/track switch |
With multiple clips selected, Selected clip refers to the last active audio clip, not every selected item. The button is disabled when no audio clip is selected. For MIDI, use Entire track: this panel does not offer a separate MIDI-clip FX chain. In track mode, the dropdown lets you change the target track.
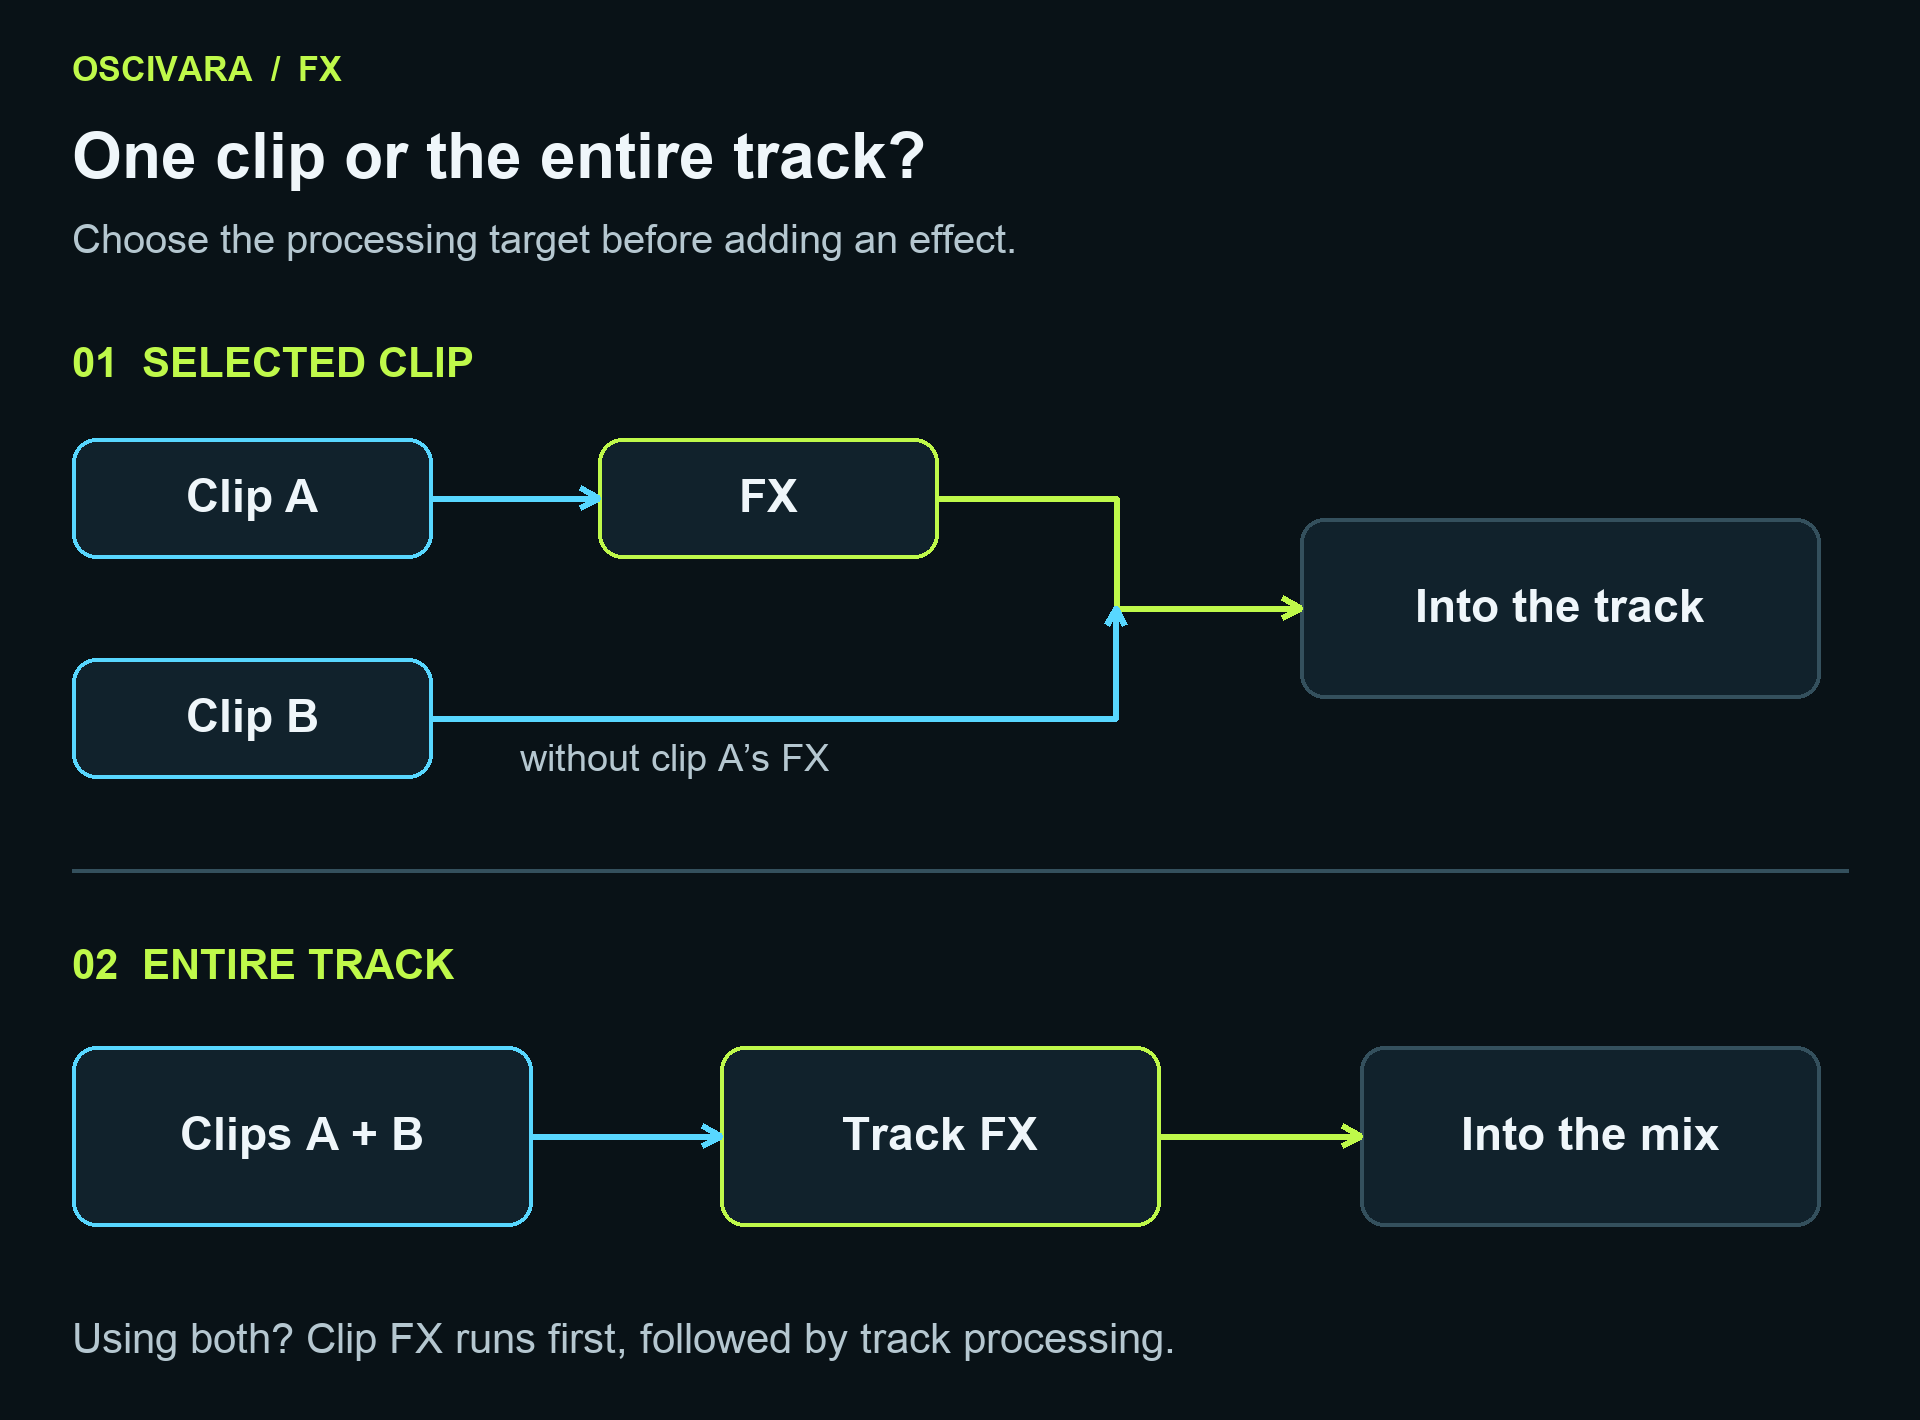 Processing scope. When both chains are enabled, clip effects run before track processing. Click the diagram to enlarge it.
Clip effects run after the clip's edits, gain, pitch changes and fades. A delay or reverb tail can therefore continue beyond the visible end of the clip. Track effects process the combined sound, including overlapping clips.
Effect cards, order and dry/wet
| Control | What it does |
|---|---|
| Add effect | Creates a separate card. You can add the same effect more than once; a chain holds up to 16 cards. |
| Card heading | Collapses the controls. Collapsing a card does not bypass its processing. |
| Enabled | Enables or bypasses this card while keeping its settings. Useful for comparison. |
| Move earlier / Move later arrows | Change processing order. Sound travels from the top card to the bottom card. |
| Remove | Removes the card. An accidental removal can be undone. |
| Dry / wet | 0% uses only this card's input, 100% uses its processed result, and intermediate values blend the two. |
“Dry” means the input to this particular effect: earlier cards may already have changed it. Compare at similar loudness and change one parameter at a time. A louder result is not automatically better.
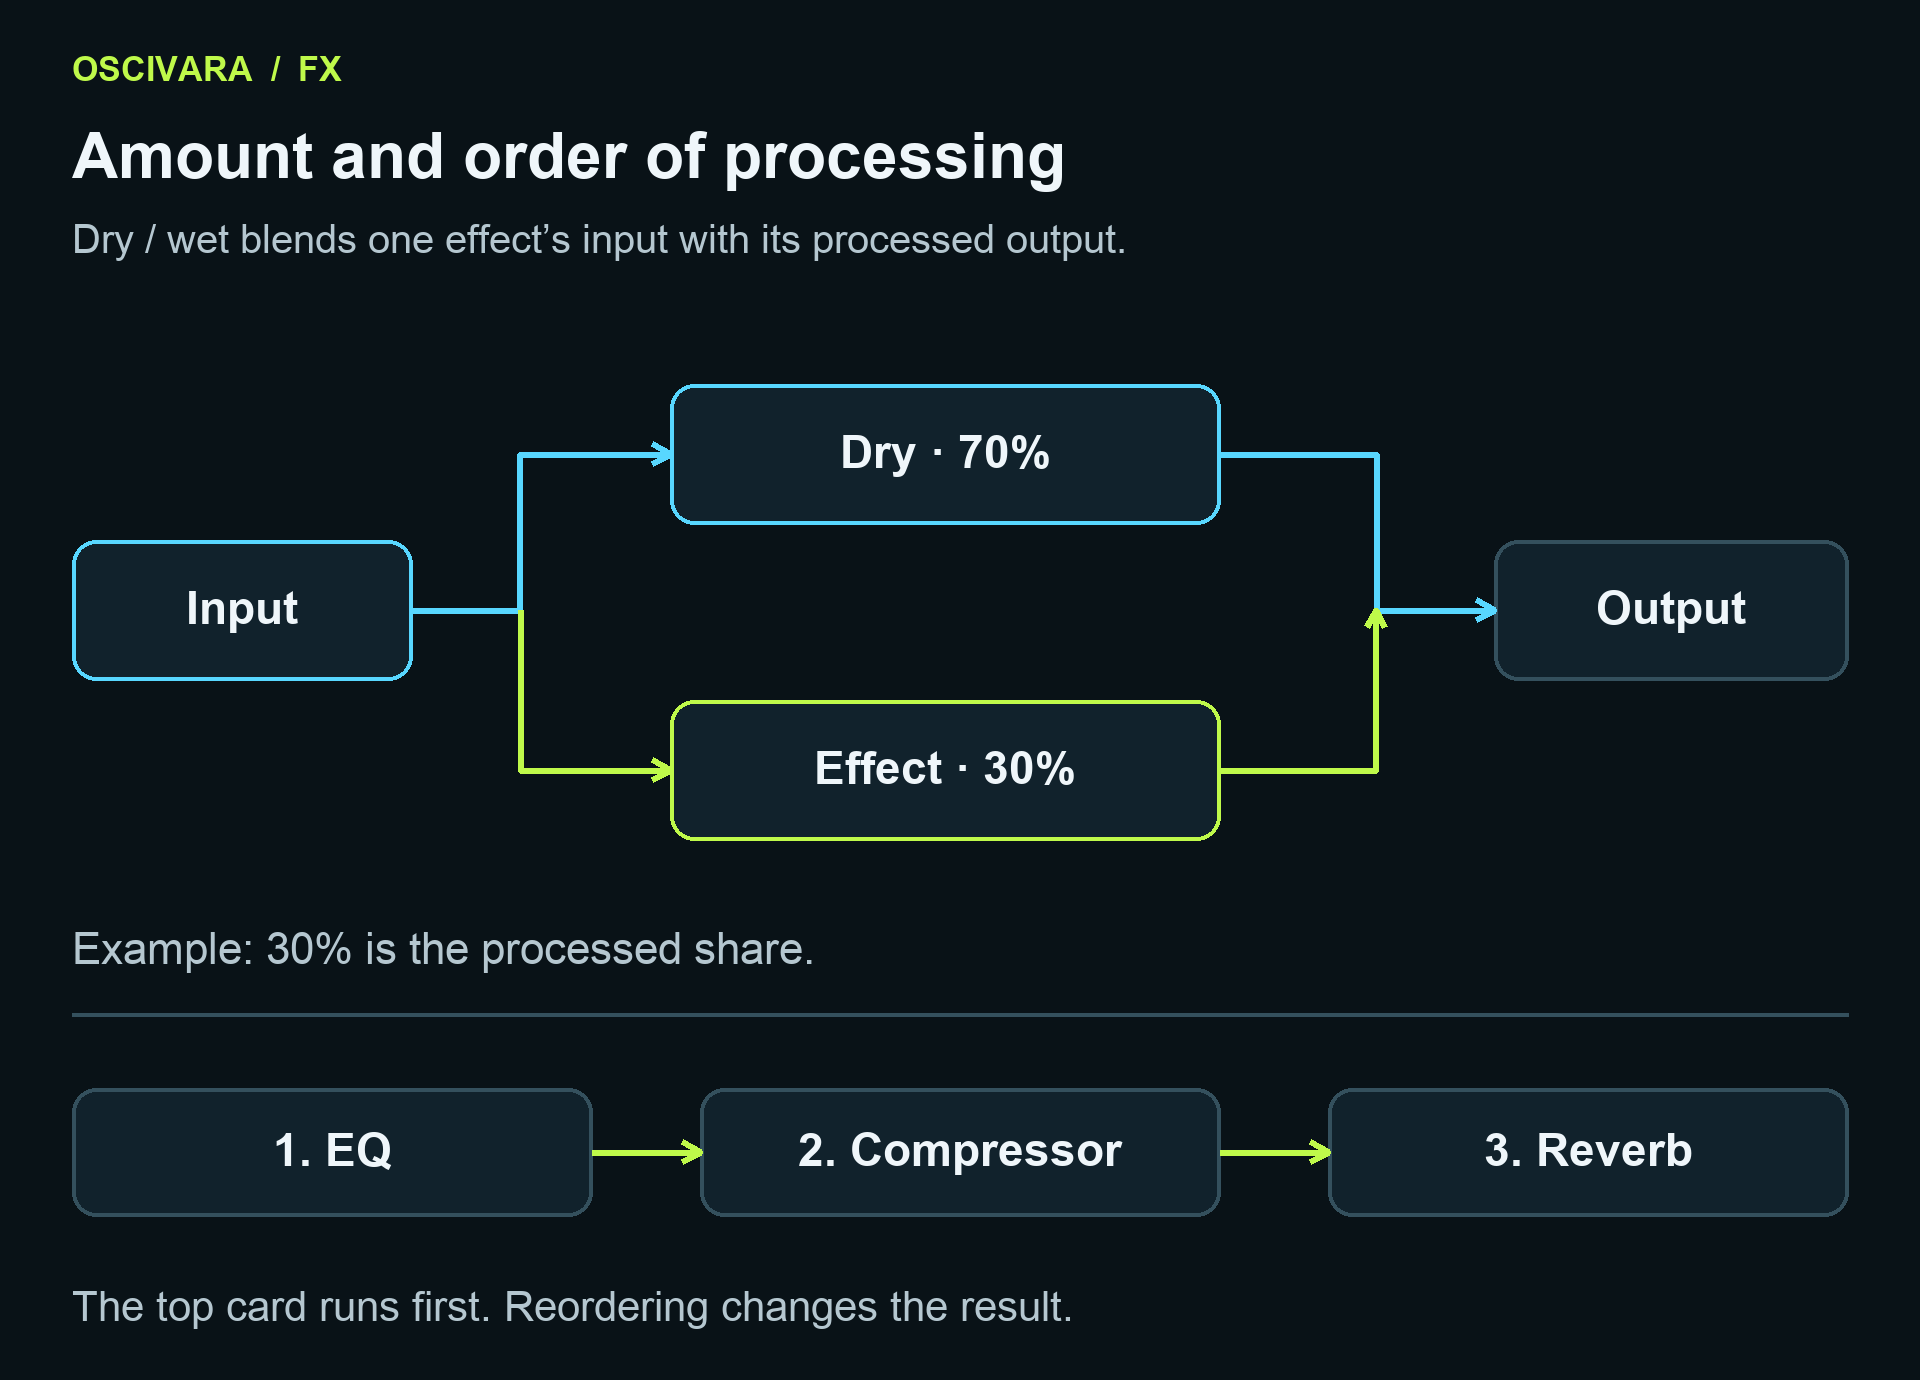 Dry/wet operates inside each card. The order of the complete chain is a separate setting. The illustrated sequence is an example, not a requirement.
Order matters. A compressor before reverb evens out the original phrase; after reverb it also reacts to the tail. A filter after distortion softens newly generated high harmonics; before distortion it changes what is being driven into the effect. Keep a limiter at 100% wet when you want it to enforce its ceiling: dry signal can bring unprocessed peaks back into the result.
Read the units
- Hz in EQ and filters means audio frequency: lower values address bass, higher values address treble. In chorus, tremolo and other modulation effects, Hz means cycles per second: 1 Hz is one cycle each second.
- ms means milliseconds; 1000 ms = 1 s. The FX compressor uses ms for attack and release; the separate channel compressor in the mixer may display seconds.
- dB expresses relative level. For gain, 0 dB means no change and negative values turn the signal down. A more negative threshold reacts to quieter input.
- Q describes bandwidth or resonance: higher Q narrows an EQ band and increases a filter's resonance around its cutoff.
- A number from 0 to 1 without a percent sign usually represents a fraction or intensity. Feedback 0.35, for example, is the fraction fed around a repeat loop, not the volume of the entire track.
Tone: frequencies and filtering
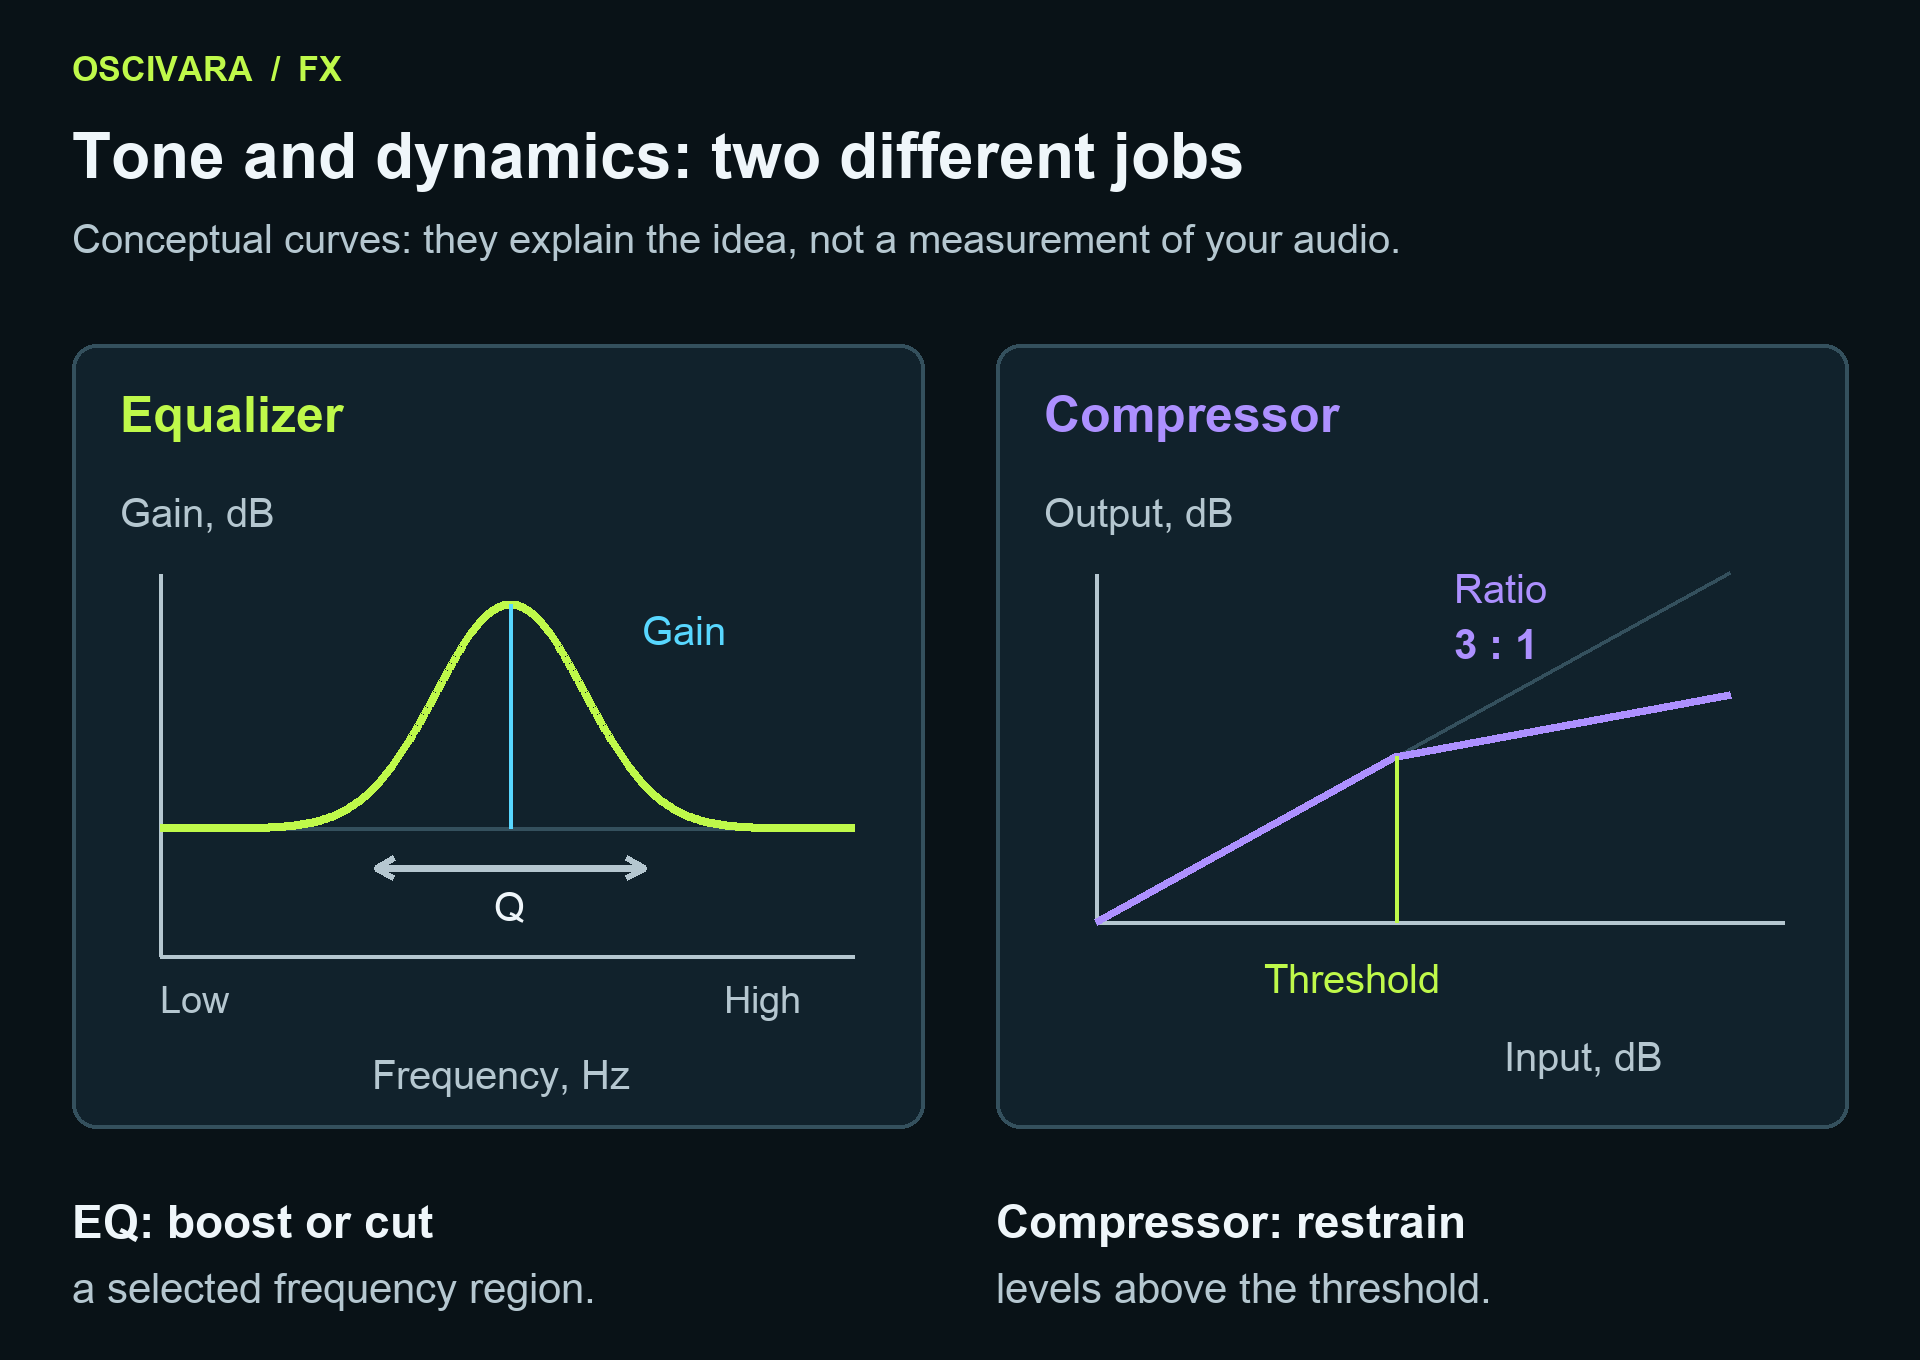 EQ changes frequency balance; compression changes dynamics. These are explanatory curves, not measurements of your recording.
Equalizer
One bell-shaped band boosts or cuts an area around a chosen frequency. Reduce an unpleasant resonance or gently emphasise clarity. For several frequency regions, add more cards or use the multiband Track equalizer in the mixer.
| Parameter | Range and effect |
|---|---|
| Frequency | 20–20,000 Hz. Centre of the region being adjusted. |
| Gain | −18 to +18 dB. Positive values boost, negative values cut. At 0 dB this band does not change the balance. |
| Q | 0.1–12. Low values create broad, gentle changes; high values narrow the band. |
For a muddy voice, try a small 2–3 dB cut around 200–400 Hz with Q near 1, then find the right frequency by ear. Do not cut this region if the recording already sounds thin.
Filter
Passes one side of the spectrum while attenuating the other. Useful for unwanted low end, a darker sound or a telephone-style voice.
| Parameter | Range and effect |
|---|---|
| Mode → Low pass | Keeps lower frequencies and reduces higher ones. It does not mean “remove bass”. |
| Mode → High pass | Keeps higher frequencies and reduces lower ones. |
| Frequency | 20–20,000 Hz. The transition boundary; sound beyond it is attenuated gradually, not erased instantly. |
| Q | 0.1–8. Higher values emphasise the region around the boundary and can produce noticeable ringing. |
For low rumble, try High pass, 70–100 Hz, Q around 0.71 and 100% wet. Raise the cutoff carefully to preserve the body of a voice. For a telephone colour, try two cards: high pass near 300 Hz, then low pass near 3000 Hz.
Dynamics: level changes within a sound
Compressor
Restrains louder moments for a more even performance. It does not repair a clipped recording or remove background noise. Set the threshold for the actual input level.
| Parameter | Range and effect |
|---|---|
| Threshold | −60 to 0 dB. Lower values bring more material into compression. |
| Ratio | 1–20. 1 means no compression; 3 means roughly 3 dB of input increase above threshold becomes 1 dB at the output once the compressor settles. |
| Attack | 0.1–200 ms. Shorter values restrain the start of a sound more strongly; longer values let more of the initial hit through. |
| Release | 5–2000 ms. How quickly gain returns after a loud moment. Too fast can cause pumping; too slow can hold down the next sound. |
For speech, try ratio 2–3, attack 10–20 ms and release 100–200 ms. Lower the threshold until loud words become more even. This card has no separate makeup control: compare output loudness with the clip or track level. Blending dry signal restores some of the original dynamics.
Limiter
Quickly reduces gain for peaks above a ceiling. This is a peak limiter; the card does not replace the master's separate true-peak control or reconstruct peaks already clipped in a recording.
| Parameter | Range and effect |
|---|---|
| Ceiling | −24 to 0 dB. Maximum processed peak level at 100% wet. Lower values apply more limiting. |
| Release | 5–1000 ms. How quickly gain recovers after a peak. |
Try −1 dB and 100 ms. A limiter often belongs near the end of a chain because subsequent processors can raise peaks again. If the sound loses impact, reduce its input level. A track limiter does not guarantee that the sum of all tracks will avoid clipping.
Gate / expander
Makes quiet passages quieter, helping reduce background sound between phrases. Noise underneath the voice generally remains. This is not intelligent noise removal.
| Parameter | Range and effect |
|---|---|
| Threshold | −80 to 0 dB. Signal below this level is attenuated. Too high a threshold cuts quiet words. |
| Range | 0–80 dB. Maximum attenuation of quiet passages; 0 applies no attenuation. |
| Attack | 0.1–100 ms. How quickly the gate opens when useful sound appears. |
| Release | 5–2000 ms. How quickly it fades after a phrase; a longer release preserves more natural endings. |
Start with 10–20 dB range and 150–300 ms release; place the threshold between the background and quiet speech. If consonants or endings vanish, lower the threshold and range. A gate usually goes before delay/reverb so it does not cut their tails.
De-esser
Softens sharp “s”, “sh” and similar high-frequency bursts. It reduces the chosen region when it crosses the threshold, without requiring a constant darkening of the whole voice.
| Parameter | Range and effect |
|---|---|
| Frequency | 2000–12,000 Hz. The sibilance region; the best value depends on the voice. |
| Threshold | −60 to 0 dB. Sets trigger sensitivity. |
| Reduction | 0–18 dB. Maximum attenuation of the selected region. |
Try 6000–7000 Hz with 3–6 dB reduction, then tune the threshold on harsh consonants. Excessive processing can create a lisp. Use EQ rather than a de-esser for ordinary low or nasal resonances.
Dynamic EQ
Cuts a selected frequency region only when it becomes loud. Useful for occasional booming notes, room resonance or harsh phrases that a constant EQ cut would make too thin.
| Parameter | Range and effect |
|---|---|
| Frequency | 30–18,000 Hz. Centre of the problem region. |
| Q | 0.2–12. Higher values focus the correction on a narrower band. |
| Threshold | −60 to 0 dB. Level of the selected region above which attenuation begins. |
| Reduction | 0–18 dB. Maximum depth of correction. |
Locate the resonance, start with 2–4 dB reduction and adjust the threshold. This card provides dynamic cuts, not dynamic boosts.
Transient shaper
Changes the initial hit and the following body of a sound. Emphasise drum attack, soften a sharp guitar pick or reduce the body of percussion.
| Parameter | Range and effect |
|---|---|
| Attack | −1 to +1. Positive values emphasise the start; negative values soften it. Here it is intensity, not a time in ms. |
| Sustain | −1 to +1. Positive values raise the following portion; negative values reduce it. This does not stretch the clip. |
Try small changes of ±0.1 to 0.2. Strong sustain boosts can expose background sound, while attack boosts raise peaks. This shapes an envelope rather than generating new notes.
Space: repeats and tails
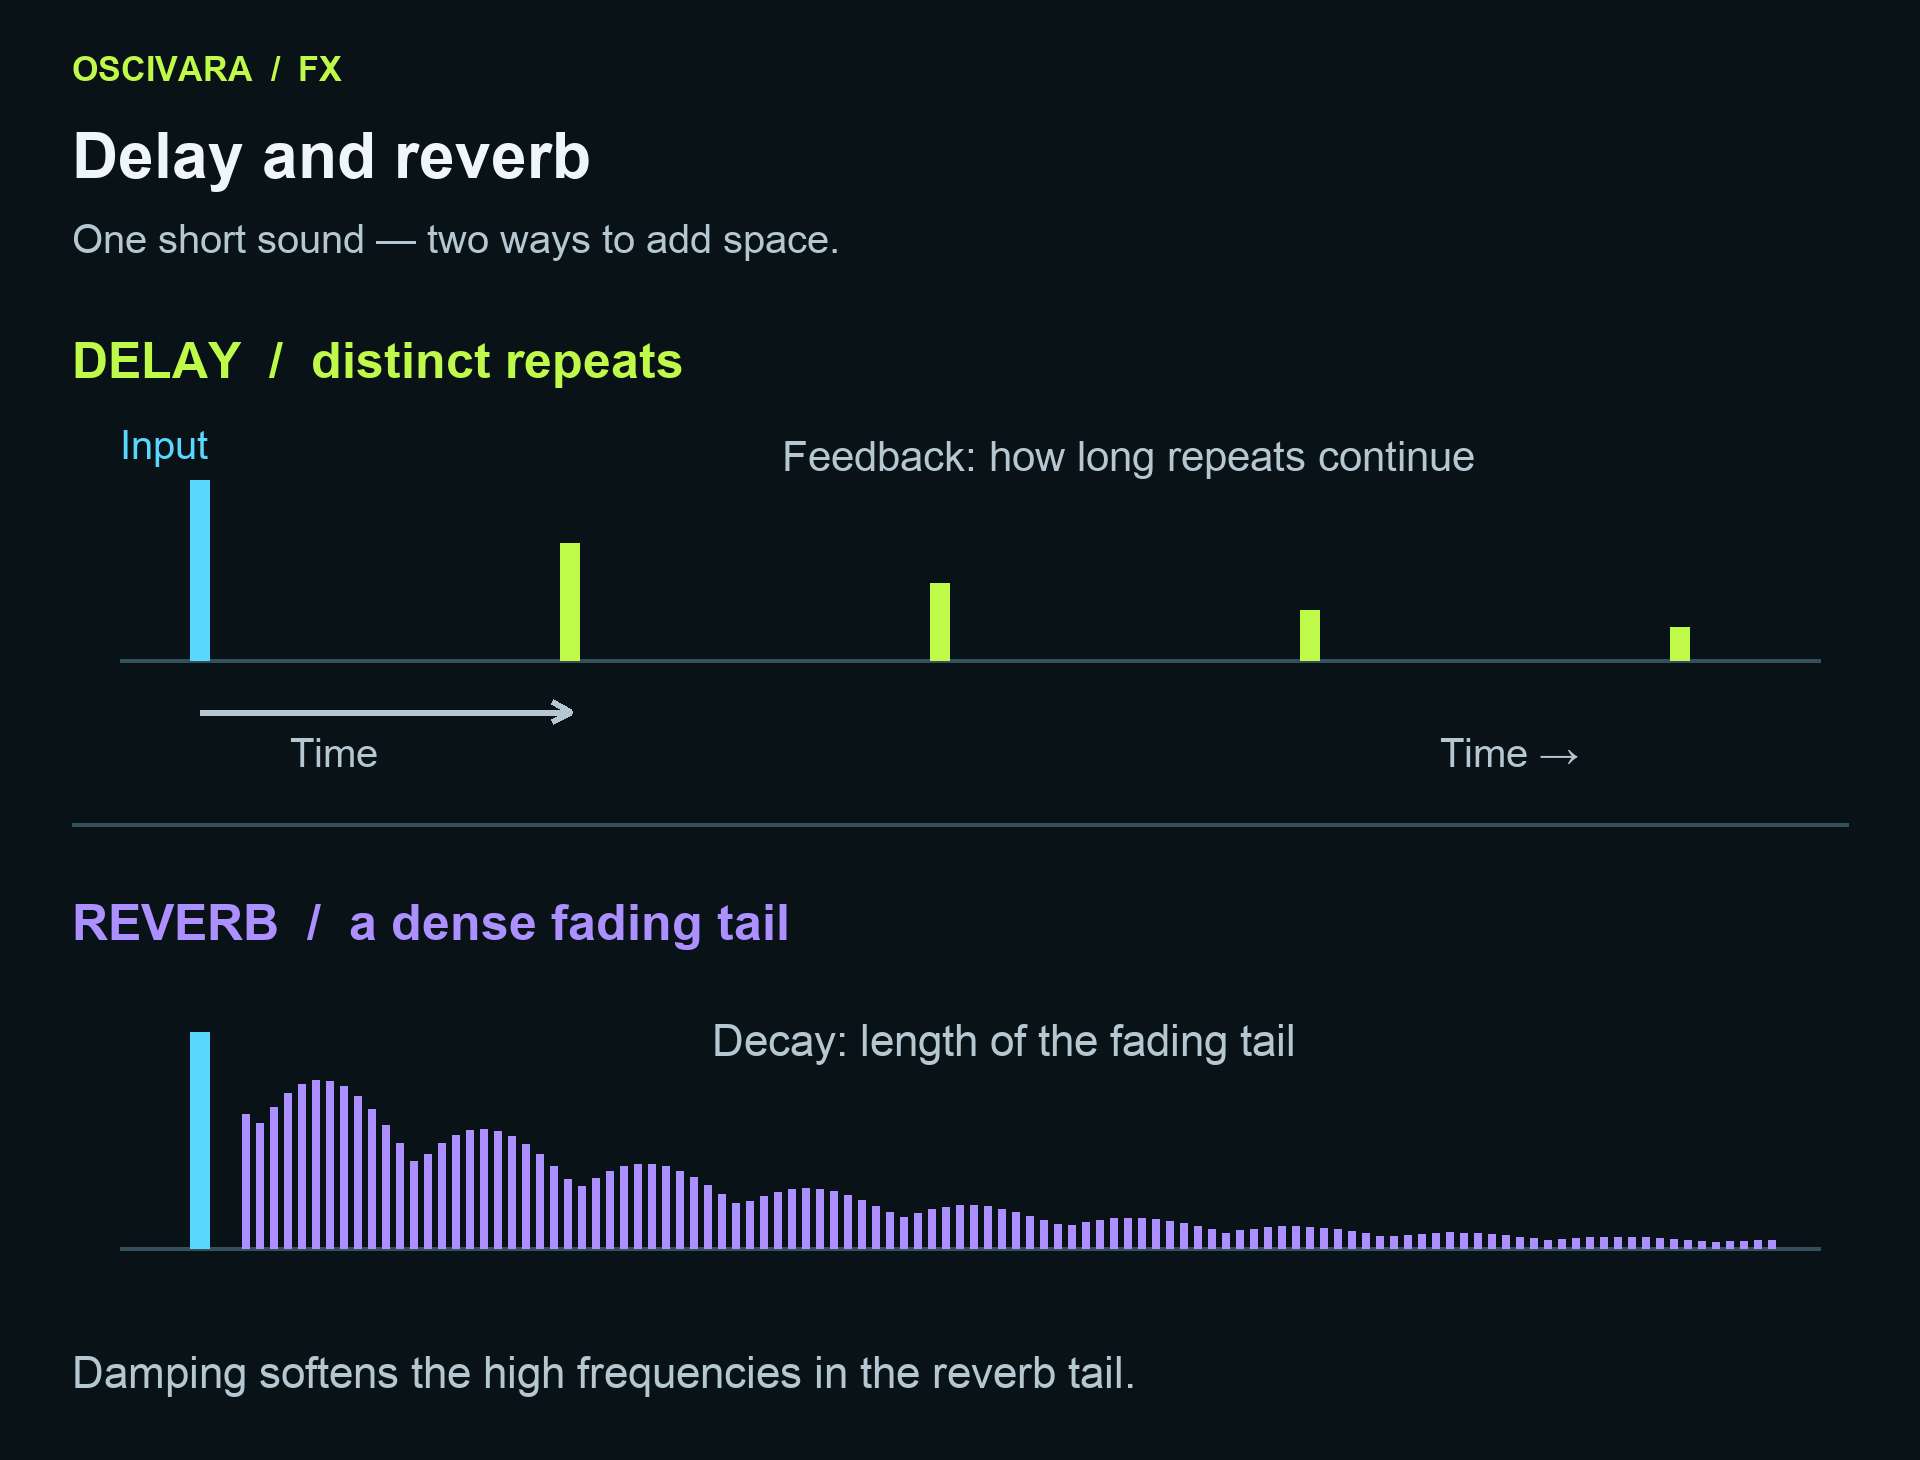 Time sets the spacing of repeats; feedback controls how long they continue. Decay sets the reverb tail, and damping changes its brightness.
Delay
Creates audible repeats. Use it on the final word of a phrase, for rhythmic echoes or to fill a gap. The built-in Delay repeats its channels; the separate WAM Ping Pong Delay moves repeats between left and right.
| Parameter | Range and effect |
|---|---|
| Time | 20–1500 ms. Spacing between repeats. Short times suggest doubling or a short echo; long times create distinct answers. |
| Feedback | 0–0.85. Feeds part of a repeat back into the delay. 0 gives one repeat; higher values create a longer, denser series. |
| Dry / wet | Amount of processed sound relative to the input. At 100% only delayed repeats remain, so the original onset may seem missing. |
Calculate musical timing manually: a quarter note is 60,000 / BPM ms; an eighth note is 30,000 / BPM ms. At 120 BPM these are 500 and 250 ms. This card has no automatic note-value sync button. For a small vocal echo, try 100–150 ms, feedback 0.1–0.2 and 10–15% wet.
Reverb
Adds dense reflections and a sense of space. A short tail suggests a smaller room; a long one creates a more extended environment. This card does not provide named halls or impulse-response loading.
| Parameter | Range and effect |
|---|---|
| Decay | 0.2–8 s. Tail decay time, not the delay before the effect begins. |
| Damping | 0–0.95. Higher values soften and darken the high frequencies in the tail; lower values keep it brighter. |
| Dry / wet | Amount of space. Too much pushes a voice back and obscures words. |
For a vocal, try decay 1–2 s, damping 0.45–0.65 and 10–20% wet. For clear speech, go shorter and quieter. Do not confuse this card with the mixer's Reverb control: that sets a send to a shared effect, while this is a dedicated insert. Using both increases the overall amount of space.
Modulation: movement and width
Chorus
Blends short copies with a smoothly changing delay. Creates thickness, stereo movement and the impression of several performances. It does not record a real second take.
| Parameter | Range and effect |
|---|---|
| Rate | 0.05–8 Hz. Speed of the delay modulation. |
| Depth | 1–20 ms. Range of delay movement; higher values make detuning and motion more apparent. |
| Feedback | −0.75 to +0.75. Strengthens the colour; the sign changes its character, while the magnitude sets its strength. |
Try 0.8 Hz, 5–8 ms, feedback 0–0.1 and 15–30% wet. Too much on a lead vocal can sound out of tune. Check the result in mono.
Flanger
Blends sound with a very short moving delay, creating a jet-like, comb-filter colour. It is usually more obvious than a gentle chorus.
| Parameter | Range and effect |
|---|---|
| Rate | 0.05–5 Hz. Speed of the sweep. |
| Depth | 0.1–5 ms. Range of the short delay. |
| Feedback | −0.85 to +0.85. A larger magnitude strengthens resonance; changing its sign changes the character. |
Try 0.2–0.4 Hz, 1–2 ms and 20–40% wet. If the sound becomes hollow or rings harshly, reduce feedback and the processed share.
Phaser
Changes phase across the spectrum, producing moving frequency notches when blended with the input. Adds a smooth rotating colour to guitars, keyboards or pads without distinct echo repeats.
| Parameter | Range and effect |
|---|---|
| Rate | 0.05–8 Hz. Speed of the movement. |
| Depth | 0–1. Range of the frequency sweep. At 0 the sweep stops, but a fixed colour can remain. |
| Feedback | −0.8 to +0.8. Intensity and character of the resonance. |
Try 0.3–0.8 Hz, depth 0.5 and 20–40% wet. The result depends strongly on blending the input with the phase-shifted signal: 100% is not necessarily more pronounced than 50%.
Tremolo
Periodically changes volume. Creates a pulse without changing note pitch; it is not vibrato.
| Parameter | Range and effect |
|---|---|
| Rate | 0.1–20 Hz. Speed of the pulse. |
| Depth | 0–1. Amount of level movement; 0 gives no pulse, while 1 reaches silence at the deepest point of the processed signal. |
At 120 BPM, 2 Hz gives one cycle per quarter note and 4 Hz per eighth note. This is manual rate calculation, not phase synchronisation with the bar grid. Start at depth 0.3–0.5; adding dry signal softens the pulse.
Auto pan
Creates movement between the left and right channels. Useful for background percussion and pads; lead vocals and bass often work better near the centre.
| Parameter | Range and effect |
|---|---|
| Rate | 0.1–10 Hz. Speed of a complete movement cycle. |
| Depth | 0–1. Range from no movement to a wide left/right sweep. |
Try 0.3–1 Hz and depth 0.3–0.6. Listen in stereo: in mono the spatial movement disappears and may become a level change. This is separate from the track's manual pan setting.
Character: harmonics and digital texture
Saturation
Gently rounds peaks and adds harmonics. Can make voices, bass or drums denser, although stronger processing also creates audible overdrive.
| Parameter | Range and effect |
|---|---|
| Drive | 0–24 dB. Gain before the nonlinear stage: higher values create stronger saturation. |
| Output | −24 to 0 dB. Level after processing; use it to compensate for added loudness. |
Try drive 2–4 dB and a similar output reduction, then match loudness by ear. A drive of 0 dB is not a guaranteed bypass: turn the card off for an exact comparison. Dry/wet can preserve more of the original attack.
Distortion
Hard-limits amplitude, adding sharper harmonics. Use it for aggressive bass, guitar or a special vocal treatment. New harmonics can make the sound much brighter.
| Parameter | Range and effect |
|---|---|
| Drive | 0–36 dB. How strongly the signal is driven into clipping. |
| Output | −36 to 0 dB. Output level compensation, not a tone control. |
For a subtle blend, try drive 6–12 dB and 10–25% wet, reducing output as needed. A low-pass filter afterwards can soften harshness. The source file stays intact, but this effect does not repair an already clipped recording.
Bitcrusher
Imitates coarse digital processing by reducing amplitude precision and holding samples. Adds grain, steps and metallic colour. It is a creative effect, not an export-format setting.
| Parameter | Range and effect |
|---|---|
| Bits | 4–16. Lower values create coarser amplitude steps and more quantisation noise. |
| Reduction | 1–32. Sample-hold factor: 1 updates every sample; 4 updates roughly every fourth sample. This is not dB or noise reduction. |
For lo-fi, try 8–12 bits, reduction 2–4 and 10–30% wet. Large reduction factors can introduce strong extra tones and destroy detail. WAV bit depth is set separately on export and does not reverse this audible processing.
Build a chain for your task
These are starting points. Add only the stages you need and judge them in the full mix.
| Task | Possible chain | What to listen for |
|---|---|---|
| Clear speech | High-pass filter → EQ if needed → compressor → de-esser | Fix obvious problems first; keep space subtle so words remain clear. |
| Vocal with space | EQ → compressor → de-esser → reverb | Start at 10–20% reverb. Background sound and consonants should not disappear into the tail. |
| Echo on the final word | Selected/separated audio clip → delay | Clip effects process the whole clip. Split the audio in the editor first when you only want one word. |
| Dense drums | Transient shaper → saturation → limiter | Compare peaks, loudness and impact. Too much limiting flattens drums. |
| Wide pad | Chorus → reverb → gentle auto pan | Check mono compatibility and leave room for a centred lead vocal. |
| Telephone / lo-fi | High pass → low pass → light bitcrusher | Tune filter boundaries and digital colour to the recording. |
Third-party WAM plugins
WAM is a browser-plugin format. In Oscivara, WAM effects are available on audio/MIDI tracks and the master; selected clips use built-in effects. Track processing runs WAM → channel processing and built-in inserts. WAM and built-in cards cannot be interleaved in one list.
- In Effects, choose Entire track and expand WAM plugin. For the master, open its own panel.
- Choose Graphic Equalizer, Ping Pong Delay or KBVerb, then press Add plugin.
- Press Plugin parameters if the controls are not shown yet. Parameter names and units come from the plugin's author.
- For another compatible module, enter its WAM module URL and press Check and add. Use a direct HTTPS JavaScript-module address from the official webaudiomodules.com community catalog; a regular plugin webpage is not a module URL.
- Wait for validation. On failure, correct the address, check the connection or use a built-in alternative. Successful loading does not replace listening and checking an export.
A chain supports up to four WAM plugins. Arbitrary websites, local VST/VST3/AU/DLL files and WAM instruments cannot be loaded through this panel. Studio exposes shared numeric controls, not a plugin's original interface. The project stores its URL and settings rather than a copy of the external module: another device must load it again. Availability and performance depend on the connection, browser and plugin; there is no universal guarantee across devices.
See Third-party WAM plugins for more detail. The format is described in the official WAM documentation.
Playback, saving and export
In standard mode, stop and restart playback after changing settings. Live mixing in the master panel lets you adjust supported parameters of running track processing while music plays. Changing chain membership/order or clip processing may require new preparation; let it finish. See live mixing and freezing.
Check that the project has saved before closing the page. Use bypass to compare, or Undo/Redo to reverse an edit. Bypassing keeps the card's settings.
Final mix export includes enabled processing and built-in effect tails. Pre-mixer stems · ZIP excludes track and master effects, but clip processing is already part of each clip's sound: these are not untouched source files. Use the original audio file when you need the original recording. Very long repeats have a finite tail allowance; listen to the exported ending before delivering it. See audio export.
Troubleshooting
| Symptom | What to check |
|---|---|
| No audible effect | Is the target correct, the card enabled and dry/wet above 0? Did you press Add effect? Restart standard playback. |
| Too many phrases changed | Entire track is selected instead of a clip, or processing exists in both chains or on the master. |
| The onset disappeared | Delay at 100% wet leaves only delayed sound; a gate threshold may also be too high. |
| The sound became quieter | Filters, compressors, limiters and gates can reduce level. Check saturation/distortion output rather than immediately turning everything up. |
| Ringing, booming or metallic colour | Reduce feedback, Q, drive or wet mix. Bypass cards one at a time to locate the cause. |
| Words are smeared | Shorten reverb, reduce delay feedback and wet mix; compare with mixer sends turned down. |
| Crackling or slow preparation | Reduce heavy effects/WAMs, close spare tabs and try freezing track processing in live mode. |
| A WAM works on only one device | Check the connection and module compatibility. A built-in alternative does not depend on an external plugin download. |
The built-in set does not include automatic pitch correction such as Auto-Tune, universal noise removal or loading arbitrary desktop plugins. Use the editor's available pitch tools where appropriate; they serve a different purpose from these FX processors.