What’s new
What’s new in Oscivara 2.9
Version **2.9.0** gives you finer control over your mix and more convenient storage: record fader moves, reorder tracks and add smooth fades to MIDI clips. Account sign-in, subscriptions and credits, and the loop library have also been updated.
Record volume and pan movements
Double-click a track header to open its Track mixer. You can also use the sliders button in the track row. Enable Live mixing and find Automation recording.
- Read plays the saved curves.
- Touch records while you hold the control, then returns to the existing curve when you release it.
- Latch keeps recording the last value after the first touch, until you stop playback.
Start playback, move Volume or Pan, then press Stop. The completed pass is saved with the project and can be undone in one action. You can restrict recording to a range. Stop playback before saving a named version or exporting, so that the current pass is committed.
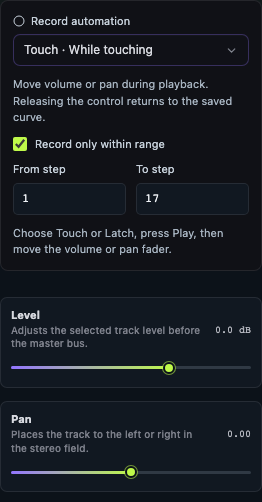 Track mixer → Automation recording. Choose the mode and range before recording a pass.
See automation recording for examples and details. The track mixer guide covers the other controls, effects and sends.
Arrange tracks in your preferred order
Drag the dotted handle beside a track name up or down and release it at the highlighted line. Audio and MIDI tracks can be interleaved; expanded automation moves with its track. The project saves this order and restores it when reopened.
For keyboard control, focus the handle with Tab: ↑/↓ move one position and Home/End move to the beginning or end. Undo/Redo also works for reordering. See the timeline guide.
Add fades to MIDI clips
Select a MIDI clip and drag the handle at its upper left or right edge. The left handle sets the fade-in; the right handle sets the fade-out. This changes the volume of that clip, including sustained notes already playing. Notes, velocities and durations remain intact.
Fades are saved with the project and included in playback and WAV export. Use the mixer or automation for changes across an entire track. Follow the clip fade instructions to get started.
Choose cloud storage and AI for your needs
Open Account → Subscription & credits. Your current plan, storage usage, balance and transaction history are together. Free offers a starting point, Cloud adds storage, and Creator and Pro combine cloud space with monthly AI credits.
One-time credit purchases remain separate from subscriptions. Current prices, allowances, conditions and checkout availability appear in that section and on the Subscription & credits page. Cards indicate when payments are unavailable. Studio and WAV export remain free.
Sign in with Google or email
Choose Continue with Google or Sign in with email in the sign-in window. Registration offers the same methods; the email form opens separately and includes password confirmation.
After a successful Google sign-in, your photo is imported if you have no avatar yet. A photo you have set yourself is preserved. If the photo cannot be loaded, sign-in still completes; import can be retried on your next Google sign-in.
Start more easily and explore loops
The empty timeline now has interactive Import audio, Add sample, MIDI and AI agent cards, plus sign-in and registration. Open Loops → Oscivara in the Studio sidebar to find material; My loops contains the upload option for your own loops.
Website loop library loading has been fixed and the Retry and Upload loops buttons improved. Previews in the library and project list now stop when you open a project or switch sections.
The Wiki includes current Russian and English screenshots and detailed guides to mix analysis, recording and export. The existing documentation structure and visual design are preserved.