Studio & timeline
Audio editor: recording takes and processing selections
Open Studio → File → Edit & record to record audio, process part of a file or assemble a new take from several selections. Processing does not overwrite the original file.
Load a file or record a take
For existing audio, press Choose file and open a mono or stereo recording. Its waveform, take list and selection settings appear after loading.
For recording takes:
- In Record a take, choose a microphone or audio interface input. System input uses the default device. Device names may appear after you grant access.
- Enable Stereo if you need two input channels and the device supports them. Mono is usually enough for a single microphone.
- Optionally enable Headphone monitoring to hear the input. Monitoring may have latency. Use headphones so speaker output does not feed back into the microphone.
- Press Record take and grant microphone access in the browser. Watch the elapsed time and level indicator.
- Press Stop. The recording appears in the take list; select it for editing.
Recording runs in this window independently of the Studio transport. It does not record multiple tracks simultaneously in sync with the arrangement.
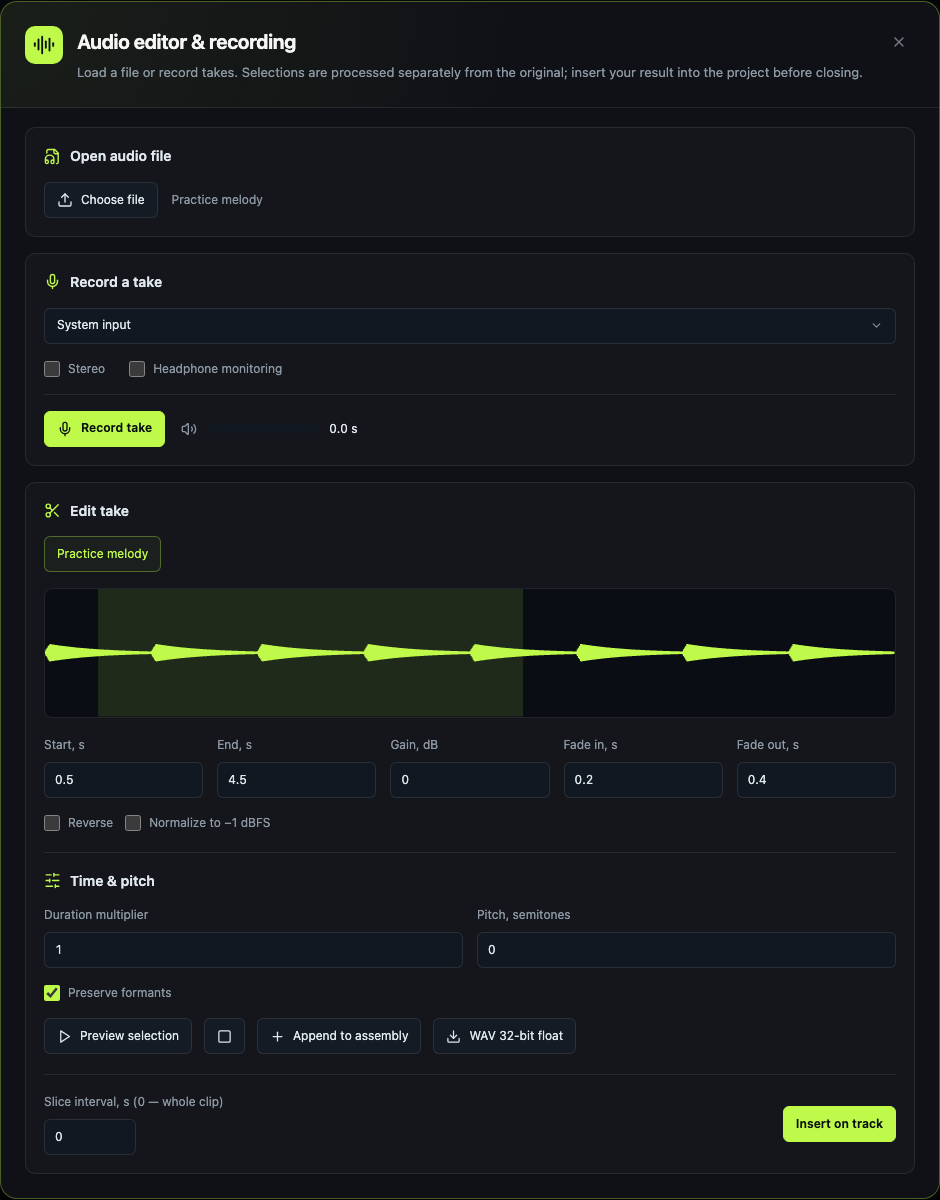 File → Edit and record. Select a take; selection bounds, fades, duration and pitch are below the waveform. Values shown are an example.
Process a selection
Choose a take, select a region on the waveform and refine its start and end in the fields. Processing applies to that selection.
- Gain changes the selection's level.
- Reverse plays it backwards.
- Normalize to −1 dBFS adjusts its peak level; it does not replace perceived loudness normalization in LUFS.
- Fade-in and fade-out settings soften the fragment's boundaries.
Press Preview selection to hear the result. The stop button ends preview playback. Switching takes resets the selection and its basic settings, so retain any result you need before moving to another take.
Change duration and pitch
In Time & pitch, set the duration multiplier and transposition in semitones. A smaller duration makes the fragment shorter, a larger one makes it longer; pitch is controlled separately. Preserve formants helps retain vocal character when transposing.
Listen to attacks and sustained sounds after changing these settings. Extreme stretching or transposition can introduce artifacts. These controls process the selection; they do not change the project's BPM.
Assemble a new take
- Select the part you want and press Append to assembly.
- Select another part of this or another take and append it again. Fragments are added in order with their current processing.
- Press Assemble new take. A short 10 ms crossfade is applied at the joins.
- Listen to the assembled take. Clear assembly clears the prepared fragment list.
Insert into the project or download WAV
Insert on track adds the processed selection as a separate audio track at the Studio playhead. Leave Slice interval, s at 0 to insert it whole. A positive value divides the result into sequential clips at that interval; it slices by time rather than detecting transients.
Use the standard Undo command to undo insertion. For a file outside the project, press WAV 32-bit float to download the processed selection.
Takes and assembly are temporary: insert the results into the project or download them before closing the window. Saving the project alone does not retain the unused takes in this window.
After insertion, use timeline scissors and fades, then mix your tracks.