Mixing & export
Level and pan automation
Automation sets how a track changes over the song. Make an intro quieter, raise the level towards a chorus, or move a sound from left to right. It works on audio and MIDI tracks and affects all their clips.
Open the graph
- Open Studio and find the track on the timeline. Add audio or MIDI first if the timeline is empty.
- Beside its name and WAV/MIDI badge, click the curve icon Show automation. Hover to see the button's name.
- A graph opens beneath the track with controls on the left. Under Automation parameter, choose Level or Pan.
- Click Hide automation to collapse it. Existing points keep working.
Both envelopes are saved and active at the same time. The selector only changes which parameter you see. Level uses a lime line; pan uses purple.
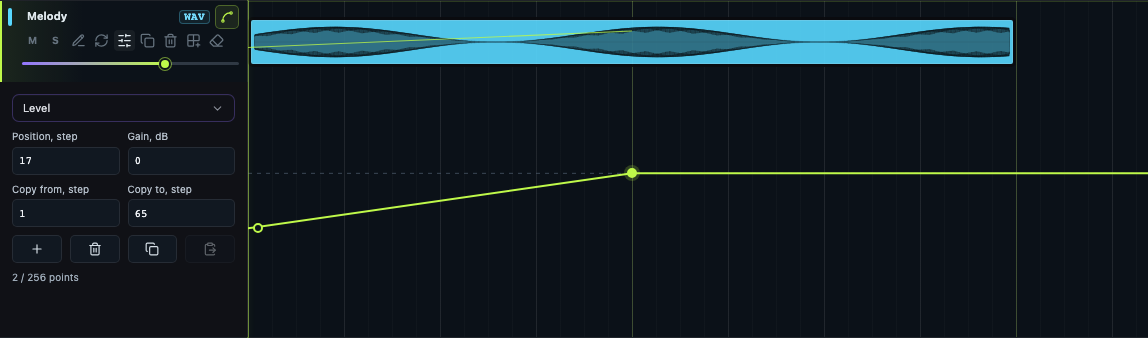 The curve button beside WAV opens the graph; precise values and range copying are on the left.
Add and edit points
Click an empty spot on the graph to add a point. Drag it horizontally to change time, vertically to change its value. Releasing the pointer commits the edit; movement before release shows a preview.
Select a point and use the left controls for precise values:
| Field or button | Action |
|---|---|
| Position, step | Point position on the timeline, counted from 1. |
| Gain, dB | Level from −24 to +12 dB. 0 dB adds no gain; negative values make it quieter. |
| Pan, −1…1 | −1 is left, 0 is centre, +1 is right. |
| Add at cursor — plus | Adds a point at the playhead with the envelope's current value. Position the cursor by clicking the ruler above the tracks. |
| Delete point — trash | Removes the selected point. Disabled when no point is selected. |
Press Enter or leave a field to apply its value. Escape cancels unfinished input. Invalid numbers are not applied. Moving a point exactly onto another leaves one point with the new value.
Values change linearly between points. Before the first point its value is held; after the last point the final value is held. A single point therefore sets a constant value throughout the track. Without points, the corresponding mixer fader applies.
Example: a quiet intro rising towards the chorus
- Select Level.
- Add a point at the beginning of the intro and set it to, for example, −9 dB.
- Add a second point where the rise should finish and set it to 0 dB.
- Listen: the level gradually increases between the points.
- To hold the quieter level longer, add another −9 dB point just before the rise should begin.
This is an example, not a required preset. Adjust levels to the material. −24 dB is not complete silence. Use M to mute a track, or fade handles to shape the start or end of one audio clip.
Example: movement across the stereo field
Select Pan. Set the point at the start of the movement to −1 and the point at its end to +1. The sound moves from left to right between them. Try −0.4 and +0.4 for subtler movement; add a later point at 0 to return to the centre.
Check on headphones or stereo speakers. Mono monitoring combines the channels, so it does not present the movement the same way as stereo.
Grid and keyboard
| Command | Action |
|---|---|
| Studio → Home → Snap | Toggles the shared step-grid snapping for points and clips. |
| Alt while clicking or dragging | Temporarily disables snapping. |
| ← / → on a selected point | Moves by one step with snap enabled, or a quarter step without snap. |
| ↑ / ↓ | Changes level by 0.1 dB or pan by 0.01. |
| Shift + ↑ / ↓ | Uses ten times the value increment. |
| Delete / Backspace | Removes the selected point. |
| Escape during a drag | Cancels the unfinished gesture. |
| Ctrl/⌘ Z, Ctrl/⌘ Shift Z | Undo and redo; also available under Home → Undo / Redo. |
One completed pointer gesture is one history action. Undo inside a numeric field may act on the edited text; use the Home buttons to undo a project edit.
Copy a passage to this or another track
- Select the parameter you want.
- Set Copy from, step and Copy to, step on the left. The end must follow the start.
- Click Copy range and look for the copied confirmation.
- Set the ruler cursor to the insertion start. To move the passage to another track, open that track's graph and select the same parameter.
- Click Paste at cursor.
The copy includes inner points and calculated values at both boundaries, preserving the slope at its edges. Points inside the destination interval are replaced; outside points remain, although connecting lines to neighbouring points may change. Paste supports Undo.
The complete range must fit within the timeline. Each parameter supports up to 256 points; a paste that exceeds the limit is rejected as a whole. Paste is disabled when the clipboard is empty or the parameters differ, such as copied level with pan selected.
This clipboard belongs to the current project session, not the system clipboard. Copy the range again after changing projects or reloading. The points themselves are saved with the project.
Mixer points and the finished WAV
The same data is available under Track mixer → Automation → Write gain point / Write pan point. Set the fader and cursor, then click the relevant button to add one point. Continue editing it on the graph.
The lower buttons add individual points. To record continuous fader movements, use Record automation near the top of the track mixer.
Envelopes are saved with the project and included in playback and Export mix. For adjustments while music plays, use Master bus → Live mixing. Resetting the mixer does not delete points: if a level keeps changing, check the graph and automation list.
See Track mixer for the location of the other controls.
Record fader movements: Read, Touch and Latch
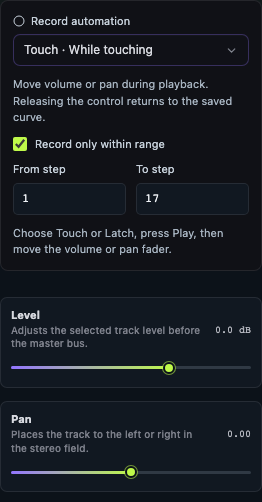 Find this section below the track name. The example selects Touch and limits recording to a range; choose values for your own arrangement.
- Open Track mixer with the sliders button in the row of the audio or MIDI track you want to edit.
- With playback stopped, enable Live mixing on the master bus, or use Enable live mixing in the recording section.
- Near the top of the mixer, below the track name, find Record automation → Automation recording mode.
- Select Touch or Latch, then choose Playback → Play arrangement.
- Move Level or Pan in this track mixer. You hear changes immediately, a curve opens below the track, and the mixer shows a recording indicator.
- Click Stop arrangement. The pass becomes one action in project history. Select Read to listen back without recording another pass.
| Mode | Behaviour |
|---|---|
| Read · Playback | Plays saved curves. An automated fader follows its curve and is locked during playback. A parameter without points remains an ordinary fader. |
| Touch · While touching | Records while you hold the control. Releasing it returns to the curve outside the recorded segment. Useful for adjusting a word or short phrase. |
| Latch · Until stop | After the first touch, keeps recording the last value even after you release the pointer. Stop ends the pass. Useful for setting a new level for a whole section. |
Arrow keys, Home and End work on a focused fader. Touch ends when you release the key; Latch keeps recording the value. Moving a fader while the transport is stopped changes the ordinary mixer setting, without drawing points.
Choose a mode separately for each track. Closing the mixer does not stop Latch. Selecting Read ends the current capture; Stop commits what you already recorded. Opening another project or reloading resets modes to Read.
Overwrite only a chosen range
Before playback, enable Record only within range and set From step / To step. Positions start at 1 and count timeline steps, not seconds or bars. With the ordinary 4/4 grid, a bar has 16 steps: steps 17 to 33 cover the second bar.
Choose Touch or Latch and start playback. Recording is allowed only inside that range, preserving the curve outside. The range limits fader recording but does not start recording by itself. To overwrite the whole range, hold the control before its start. Positions on a MIDI track follow that track's tempo map.
During looped playback, a later pass replaces the earlier one only where you record. Stop finishes the recording; one Undo restores all its loop passes and both curves, including changes recorded on multiple tracks.
Saving, Undo and recording limits
Until Stop, curves are drafts and manual editing of a recorded curve is temporarily unavailable. Stop recording before saving a named version or exporting. After Stop, points use the ordinary project saving mechanism, survive reopening, and affect Export mix.
Main → Undo after stopping restores all curves to their state before recording; Redo restores the pass. Undo during recording cancels the draft and performs the ordinary undo of the last project action. Switching projects, deleting a recorded track, editing its curve another way, or changing tempo cancels an unfinished recording to avoid placing points at incorrect times.
Redundant points are reduced automatically, with at most 0.05 dB error for level and 0.002 for pan. The limit remains 256 points per parameter. If the result cannot fit within this limit accurately, the entire current pass is rejected with a message and the old curves remain. Record shorter passes or remove unnecessary points.
This records level and pan in the track mixer. It does not record sends, effect parameters, external MIDI controllers or microphone takes. To record audio, use File → Editor & recording.