Mixing & export
Track mixer: find and use every tool
The track mixer controls one audio or MIDI track: its level, stereo position, space and processing. All clips on that track pass through its mixer. Use clip settings when you want to change just one passage.
Open the right track
- Open Studio and find the track on the timeline.
- Below its name, click Track mixer, the button with sliders. The matching tab opens on the right.
- Check the track name in the panel heading before making changes.
- Scroll down inside the right panel. Click a section heading to reveal its additional controls.
If the right area is hidden, use Show Studio sidebar in the top timeline row. The sliders button opens the mixer for both audio and MIDI tracks. Double-clicking a MIDI clip opens the note editor; use the sliders button to mix it.
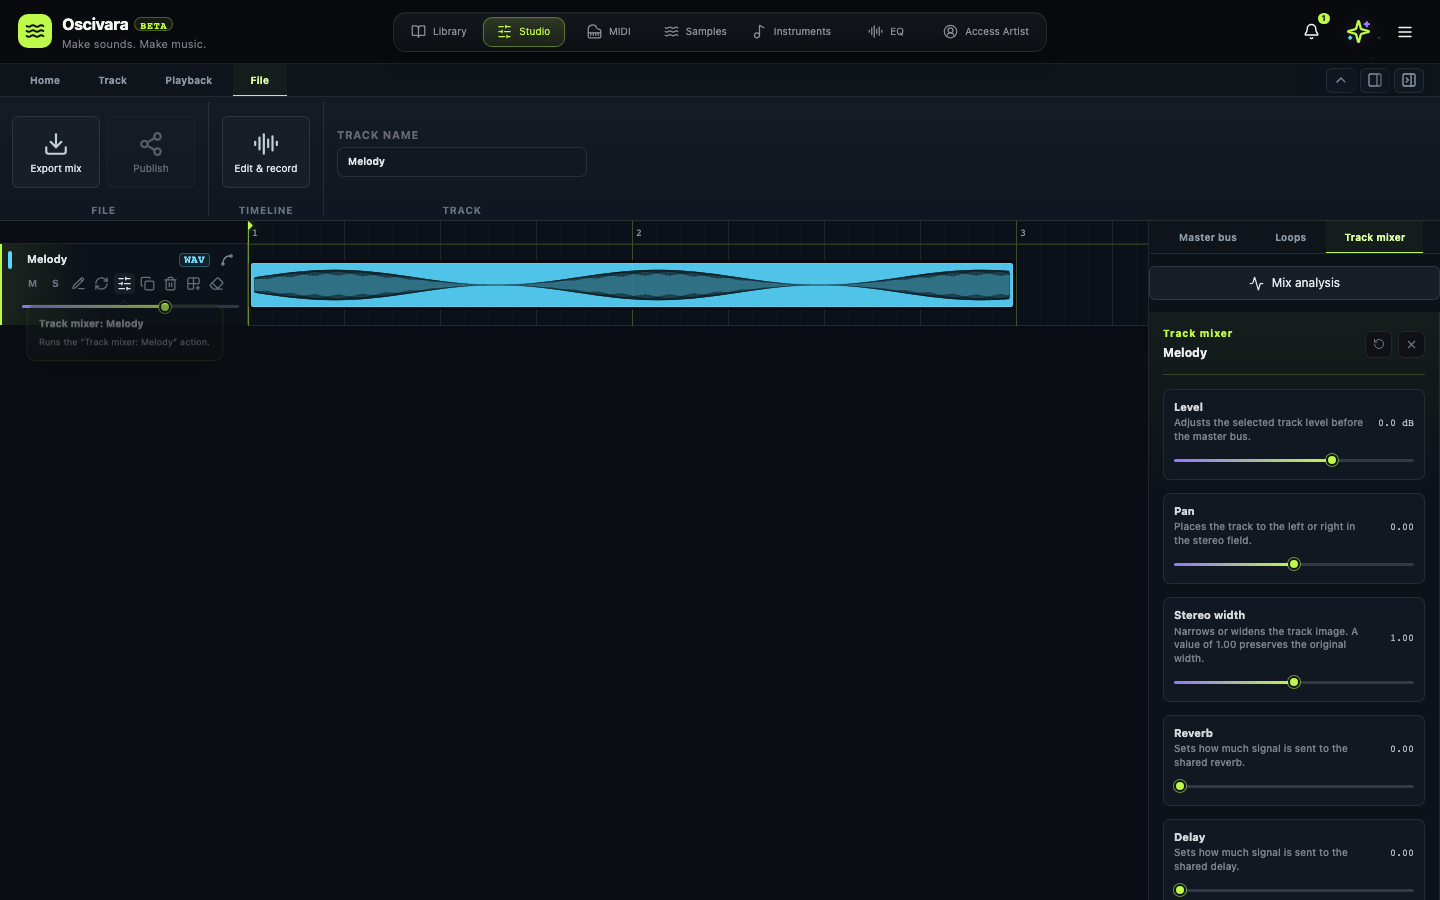 The sliders button opens the mixer on the right. Scroll down inside it for the remaining tools. Click the image to zoom.
Find a control, from top to bottom
| Your task | Where to go |
|---|---|
| Inspect the selected track's frequencies, levels and stereo | Mix analysis, above the mixer |
| Reduce processing load in live mixing | Freeze processing, above the mixer; available when live mixing is enabled |
| Set balance, stereo and space | Level, Pan, Stereo width, Reverb, Delay |
| Shape the frequency balance | Expand Track equalizer |
| Control loud peaks | The Compressor checkbox and the expandable section with the same name |
| Duck bass when the kick hits | Sidechain |
| Add a browser plugin | Third-party plugins · WAM |
| Add a gate, de-esser or other processing | Effect chain |
| Route the track to a shared group | Track output |
| Choose the part's role in the mix | Mix bus |
| Store a level or pan value at the cursor | Automation, at the bottom of the mixer |
| Draw changes throughout the song | The curve button Show automation beside the track name on the timeline |
Balance and space
| Control | How to use it |
|---|---|
| Level | Adjusts channel level before the master bus. 0 dB adds no gain; negative values are quieter, positive values louder. Start by turning down competing parts. |
| Pan | −1 is left, 0 is centre, +1 is right. Spread parts without making one side dominate. |
| Stereo width | 1 preserves width, 0 narrows to mono, values above 1 widen stereo. Widening a mono source does not create an independent stereo recording. Check the result in mono. |
| Reverb | Send level to the shared space effect. 0 removes this send. It controls the amount sent from this track, not the reverb tail length. |
| Delay | Send level to the shared repeat effect. 0 removes the send. Too much can blur rhythm and detail. |
M and S are on the track itself: M mutes it, S auditions it solo. Check solo if other parts disappear. Track level, individual clip level and the Master output level affect different parts of the signal path.
When level or pan automation points exist, the envelope controls that parameter over time. Read follows this curve and locks the automated fader during playback. Edit the graph directly, or use Touch/Latch in Record automation below the track name to overwrite a passage while listening.
Track equalizer
Open Track equalizer → Add band. Up to six bands are available. The checkbox beside a band number bypasses that band; the trash button removes it.
| Band type | What it does |
|---|---|
| HPF | Attenuates frequencies below the cutoff, such as unwanted low end. |
| Low shelf | Boosts or cuts the lower frequency region. |
| Peak | Changes a region around the selected frequency. |
| High shelf | Boosts or cuts the upper frequency region. |
| LPF | Attenuates frequencies above the cutoff. |
Frequency selects the region. Gain sets the boost or cut in dB for Peak and shelving filters. For Peak, Q controls bandwidth: higher values narrow the region. For cutoff filters it affects resonance near the cutoff.
Start with one band and a small change. Use its checkbox to compare. The right frequency depends on the recording; one set of values will not suit every voice or instrument.
Compressor
Enable the upper Compressor checkbox, then expand the Compressor section below the equalizer. Opening the section alone does not enable processing.
| Parameter | How it affects the sound |
|---|---|
| Threshold | Level above which gain reduction begins. A lower threshold affects more of the signal. |
| Ratio | Amount of compression above the threshold. Higher values restrain loud moments more strongly. |
| Attack | How quickly reduction begins. A short attack restrains the beginning of a hit more strongly. |
| Release | How quickly the compressor lets go after a loud moment. |
| Makeup gain | Gain after compression. Use it to compare at a similar loudness. |
| Parallel mix | Proportion of compressed signal: 0 is dry, 1 is processed. |
Times in this section are in seconds: 0.01 s = 10 ms. If drums lose their attack or the sound pumps too much, reduce processing and revisit attack and release.
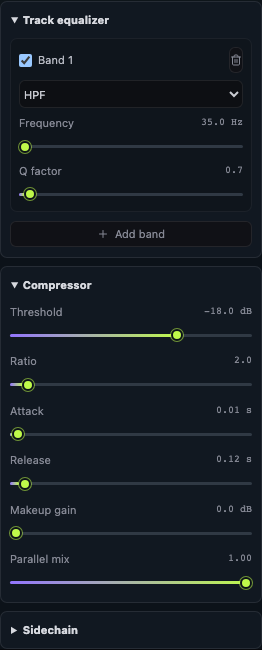 Track mixer: scroll below the main faders. This example has one EQ band and the compressor enabled; these are not universal settings.
Sidechain: let one track control another
Example: the bass gets slightly quieter when the kick hits.
- Put the kick and bass on separate tracks.
- Open the bass track mixer → Sidechain.
- Select the kick under Trigger track. Selecting a source enables this processing.
- Set Amount, Attack and Release while listening to both parts together.
- Choose Disabled in the source menu to disable it.
The source must differ from the processed track. Amount sets the strength of ducking; attack sets the reaction speed; release sets the return to normal level. This is a separate section: the main compressor checkbox does not select a sidechain source.
Effect chain
Under Effect chain, select a processor and click Add effect. Each card contains parameters, an Enabled checkbox, reorder arrows and a trash button. Dry / wet blends the input with the result: 0% is dry, 100% is processed.
| Effect | Purpose and main controls |
|---|---|
| Equalizer | Additional frequency correction at a chosen position in the chain. Frequency sets the centre, Gain the boost/cut, Q the width. |
| Compressor | Another stage of dynamics control. Threshold, Ratio, Attack and Release have the same meaning as the channel compressor; times here are in ms. |
| Gate / expander | Attenuates quiet background sound. Threshold sets the boundary, Range the maximum attenuation, Attack and Release the response speed. Too much range can cut note endings. |
| De-esser | Softens harsh sibilance. Frequency selects the region, Threshold the trigger level, Reduction the attenuation strength. |
| Dynamic EQ | Attenuates a selected region when it becomes loud. Set Frequency, Q, Threshold and Reduction. |
| Transient shaper | Shapes the beginning and body of a sound. Attack emphasises or softens the hit; Sustain changes the following part. |
| Saturation | Adds harmonics and density. Drive increases processing character; Output compensates the level. |
Order affects the result. The up arrow moves processing earlier; the down arrow moves it later. Up to 16 effects fit on a channel. The channel EQ and compressor above are separate stages: adding a processor with the same name does not replace them. Compare with the checkbox rather than deleting the card.
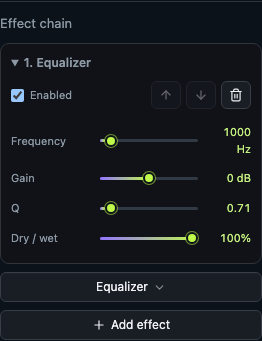 Effect chain → Add effect. Parameters are inside the card; arrows change the order and the bin removes the effect.
Third-party WAM plugins
Go to Third-party plugins · WAM → effect menu → Add plugin. In its card, click Plugin parameters, then adjust the available controls and Wet mix. The checkbox enables or bypasses processing, arrows reorder it, and the trash button removes it.
Up to four WAM plugins fit on a channel. Loading requires a network connection. WAM and built-in effects use separate chains; native VST3/AU plugins cannot be installed here. See Third-party WAM plugins for the supported catalogue, walkthrough and troubleshooting.
Output, role and automation
Track output routes the channel to Master or a group you created. If the list contains only Master, first use Master bus → Group buses → Add group. The mixing guide explains shared drum processing.
Mix bus sets a role: automatic, drums, bass, harmony, melody, atmosphere or transitions. It is separate from routing to a user-created group.
At the bottom, Automation → Write gain point / Write pan point adds one point at the current playhead using the corresponding fader value. These buttons do not continuously record mouse movement. Remove points from the list or edit them in the graph under the track. See Level and pan automation for the complete workflow.
To record continuous movements, use Record automation below the track name. Enable live mixing while stopped, select Touch or Latch, start playback and move Level or Pan. Stop commits the entire pass as one Undo action. Read follows saved curves and locks automated faders during playback. See Level and pan automation for the mode behaviour and recording within a chosen range.
Analysis, freezing and live mixing
Mix analysis above the mixer opens the analyser with this track selected as its source. Enable live mixing and start playback to measure. It offers spectrum, spectrogram, levels and stereo correlation.
Freeze processing appears when Master bus → Live mixing is enabled. It calculates channel processing ahead of playback to reduce load; faders and sends remain available. Unfreeze processing restores the regular mode. Changes to relevant sound settings prepare the result again.
Many controls are audible during playback in live mode. Changing plugin membership or routing requires preparing a new signal path. In regular mode, changes are heard on the next playback. Stop playback before switching the mode itself.
Reset, close and save
Close hides the panel while keeping its settings. Reset track mixer restores mixer defaults, including clearing its EQ, inserts, WAM and sidechain and returning the output to Master. Automation points belong to the track separately and are not erased by this reset.
Use Studio → Home → Undo / Redo if a change does not work for you. Mixer settings and points are saved with the project. Export mix includes processing; Pre-mixer tracks · ZIP exports material before channel and master effects — see audio export.